Pro tips to install a beautiful wood floor.
In the past decade we’ve seen the introduction of a wide variety of flooring materials and installation systems, but traditional nail-down tongue-and-groove wood flooring remains one of the most beautiful, durable and popular options available. And you may be surprised to learn that most homeowners can install it themselves.
Traditional wood flooring is installed similarly to many types of engineered or laminate flooring, but it does involve several specific techniques that are unique to nail-down installations. To learn how to do the job right, here are the tips I gleaned that will help you achieve great results.
Wood flooring falls into two main categories: solid and engineered. Solid-wood flooring is just what it sounds like: floorboards milled from solid pieces of wood. A solid-wood floor can last more than 100 years and can be sanded and refinished several times as the surface wears. Engineered-wood flooring features a 1/12- to 1/4-in.-thick layer of solid wood (the wear layer) that is glued to a cross-grain plywood substrate. Engineered flooring with a wear layer thinner than 1/8 in. is too thin to sand, but flooring with a wear layer that is at least 3/16 in. thick can be sanded and refinished a couple of times. The main advantage of engineered wood is that the plywood substrate is more stable than solid wood, making it suitable for installation in below-grade locations such as basements and in climates that experience high humidity.
PLANNING AND PREPARING TO INSTALL A NAIL-DOWN SOLID-WOOD FLOOR
Don’t plan to purchase your flooring on the same day that you will begin the installation. Whether you’re installing solid or engineered flooring, the boards need time to acclimate to the humidity of your home — about three or four days if you unpack and stack the boards in your house. If you leave the boards in the boxes with the box ends open, you’ll need to allow a couple weeks for acclimation.
Wood flooring should be installed over a subfloor that is at least 3/4 in. thick. For this project, we removed two layers of old sheet linoleum to expose the original 1×8 subfloor boards. Inspect the subfloor, remove all protruding nails, and sand high edges between subfloor boards or plywood sheets. Mark low areas that are an 1/8 in. or more below the surrounding subfloor over a span of 6 ft.; you’ll need to shim them with thin plywood scraps, building paper, wood shims or wood shingles.
Nail-down wood flooring is installed perpendicular to the floor joists. Roll out and staple a layer of 15-pound asphalt building felt or designated flooring underlayment barrier in the same direction that the flooring will run. Overlap each course 3 to 6 in. The building felt creates a moisture barrier that helps to minimize expansion and contraction and limit squeaks caused when the flooring and subfloor rub together. Snap chalk lines across the building paper to mark the floor-joist locations.
INSTALLING THE FIRST ROW
The first step in installation is to determine your starting line. The three most common options for where to start your installation are; along the longest straight wall, in the middle of the room and tying into existing flooring.
Starting along the longest wall
Typically you should start along the longest straight wall that has the fewest obstacles. Determine whether the walls are parallel by measuring between the side walls at each end of the room. If the measurements are within 1 in. of each other, the walls are close enough to parallel that you can go ahead and mark the starting line along the wall at a distance that is the width of one board plus 3/4 in. for expansion.
If the difference between the side wall measurements is more than 1 in., you’ll likely end up with a long wedge-shape gap at the final row that will be difficult to fill with a flooring board and may be too wide to cover with base trim. To avoid this, increase the starting line’s distance from the wall: Add the width of the flooring plus 3/4 in. plus half of the difference in the side wall measurements. This will split the difference, making the gaps on both sides of the flooring easier to cover with trim.

Fill the expansion gap between the flooring and the wall with floorboards turned on edge or with stacked shims to prevent the first rows from shifting when they are nailed. Flip the last board end for end to mark it for cutting.
Starting in the middle of the room
In a room that’s wider than 16 ft., it’s best to snap a starting line down the middle of the room, install the boards with the tongues facing the outside walls and work out to the side walls. Use a spline (called a slip tongue) to join the middle boards.

A slip tongue is a strip of wood that’s the same size as two tongues placed back to back. Slip tongues make it possible to install two boards groove-to-groove. They are most often used when you need to change direction or install from a middle starting line. When starting an installation in the middle of the room, the first two boards are joined with a slip tongue so that the milled tongue in each board faces out. This permits the installer to continue installing out in both directions with the tongue exposed for nailing.
Tying into existing tongue-and-groove wood flooring
One final installation option that does not require marking a starting line is tying into existing flooring. If the floorboards are the same thickness, you can sometimes fit the tongue-and-groove joints of the old and new flooring together. You must expose an undamaged tongue in the old flooring to create a tight seam with the groove in the new flooring. In our case, we removed the existing end board because it had no tongue. We cut the board in half with an oscillating multitool and then gently pried out the two halves, being careful not to damage the tongue in the next board. We then installed the new maple flooring as if it were a continuation of the existing oak floor.
We removed the existing end board because it had no tongue. We cut the board in half with an oscillating multi-tool and then gently pried out the two halves, being careful not to damage the tongue in the next board.

We installed the new maple flooring as if it were a continuation of the existing oak floor, tapping the groove on the new maple board over the tongue on the existing oak flooring. We attached the boards with 2-in. staples driven by a floor-staple gun.
Once the starting line is established, lay out the first row along the line with the groove side facing the wall (unless you’re installing from the middle, in which case the tongue faces the outside wall). Leave a 1/4- to 1/2-in. space at the end wall. Shim between the wall and the boards to keep the first row from shifting as additional rows are nailed. Attach the first board with a 16-gauge finish-nail gun. Face nail along the wall every 6 in., and toenail through the tongue at every joist and every 6 to 8 in. between the joists.
When you reach the end of the row, flip the final board to mark it’s length and avoid cutting off the wrong end of the board (Learn this technique in the Wood Flooring Tip video below). Continue to install the next three or four rows of flooring.
RACKING AND INSTALLING THE FIELD
Racking is the process of laying out the floorboards before fastening them in place. It may seem like extra work, but racking the floor will actually speed up the installation and prevent many mistakes.
Start racking out rows of boards, leaving a 6-in. space of open floor between the last installed row of flooring and the first row of racking layout. Stagger the end seams between rows by at least 6 in., and avoid creating obvious seam patterns. After laying a few rows, step back and identify any ugly seam patterns or boards that stand out because they are too dark, too light or damaged. Keep in mind that there are always more short boards than long boards, so don’t use up all of the long boards too soon.
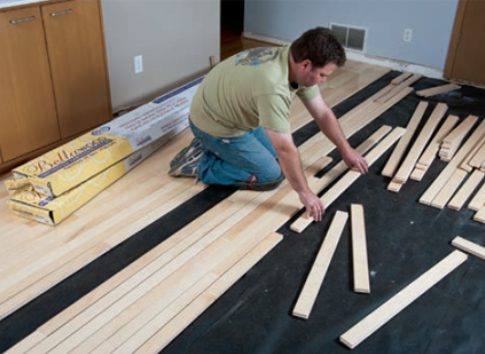
Rack (lay out) several rows of boards before fastening them in place. Leave a 6-in. space of open floor between the last installed row of flooring and the first row of racking layout. Stagger the end seams between rows at least 6 in., avoid creating obvious seam patterns, and remove boards that are damaged.
Rack out as far as you can; then go back to the first rows and begin fastening one row at a time with the nail gun. Position each piece and tap the seams tight. Use a jigsaw, drill or multi-tool to notch the boards to fit around obstacles, such as floor vents or radiator pipes, as you get to them. Drive a nail at every joist line and every 8 in. between the joists.
INSTALLING A BORDER
Border pieces cover board ends that do not extend all the way to the wall. This is most common where the wood floor transitions to another type of flooring. In our case, one corner of the room was to be tiled as an entry area. We framed the area that would be tiled with a mitered border (see below). We then installed the remaining rows of boards by fitting the border board’s tongue into the end groove of the flooring board and cut the last board in the row at the opposite wall where it would be covered with base molding.
STAIRS
The ends of the flooring boards must also be capped at the top of stairways. Installing a manufactured stair-nosing piece is similar to installing a border. The stair tread features a groove on one edge. The tongue end of the floor boards fits into this groove.

Install a manufactured stair-nosing piece at the top of a stairway. Face nail the stair-nosing board in place. The stair tread features a bullnose profile on the front edge that overhangs the stairway (see inset photo) and a groove on the back edge. The tongue end of the floorboards fits into this groove.
FINISHING THE WOOD FLOOR INSTALL
Use a 15- or 16-ga. finish nail gun to toenail into the tongues and face nail through the tops of the boards when you can no longer fit the gun between the wall and boards. Use a pry bar against the wall to pull the final rows tight as you nail them. Finally, fill the face-nail holes with putty, and your floor is complete.

Leave a gap of about 3/4 in. between the final row of flooring and the wall. If necessary, rip-cut the final row of boards to fit. Face nail the final row with a 15- or 16-gauge finish-nail gun. Use a pry bar against the wall to pull the final rows tight as you nail them.
WOOD FLOOR NAILING OPTIONS
When it comes to fastening flooring, pneumatic nail guns are easy to use and deliver the most consistent results. The three best types of nail guns for flooring installations are:
– 16-gauge finish nailer – for first and last rows where flooring nailers won’t fit
– Staplers – for most domestic hardwoods and softwoods
– Cleat nailers – for all wood species. Cleats are especially recommended for the hardest flooring materials, such as exotic hardwoods and manufactured varieties that contain resins, such as strand-woven bamboo.

My name is Author Name. I post about home improvement ideas and how to make your home look beautiful and liveable. I hope my posts will help you with your DIY projects!


